Saturday, April 22, 2023

Panama - Pa'delante

 Panama is a central american country. As such it is not a rich country. And, they are still behind in many areas, compared to Europe, Canada, US and such. At the same time they are ahead of the US in several aspects as well!

I spent a lot of time in Panama City over the last two months. I observed many signs of improvements and many attempts to facilitate improvements in areas where it is urgently needed.

That's one of the big difference with the US. In the US there are no movements in any of the important topics: guns, two-party-system deadlock, public transportation, healthcare for all, schools, quality of education across the board, the (bad!) joke of a legal system, and so much more...

But, let me talk about Panama. Much more interesting! And much more to report about, too!

Here are a few pictures of bill-boards I noticed across the city and country:

https://drive.google.com/uc?export=view&id=1ZywsW2Z749FbE-rxTpzGkoCrANnekbSwhttps://drive.google.com/uc?export=view&id=1CUy6YeLeyiKk-W3iLVuyeJvQqprS-7DDhttps://drive.google.com/uc?export=view&id=1VOnigLnLlWLDGH6rA0w4AVOVs-e3FoHShttps://drive.google.com/uc?export=view&id=1BjUISdRQy6ZZA5yhOvXv6qHk6jWH8jmFhttps://drive.google.com/uc?export=view&id=1WLrhw1iuwHWzLE9LjbppNVWR5A0bkmzphttps://drive.google.com/uc?export=view&id=1SfyaGORPaMkIl6yAng4nEihzYiCrfK0R

These bill boards show, that the government is trying very hard to move the country forward in a good direction. Yes, the majority of the population isn't there yet, and doesn't care much about any of these topics - many are still struggling to put food on their table. But, as Panama is putting a lot of effort into educating their young, the change is going to be happening soon, I would say...

Panama has built schools in every little village! A governmental school - so it is affordable and accessible to everybody. Yes, not all schools have the best teachers - yet! But, that is changing already, as more and more kids are finishing university.

Panama also has general public health care system that everybody has access to. Imagine this! Panama has figured out a way to do this, while the oh so great US seems to be incapable of it! Oh, and the doctors in the public hospitals are quite well educated and capable! The hospitals may not look all too great, but the quality of care is impeccable! And VERY affordable, too, I may add!


This and that, poco a poco

Since we returned to Santa Catalina on Tuesday, it has been a quite productive time. Slowly, step by step, one outstanding task after the other is tackled.

I let me ex brother-in-law inspire me to try to do a little different design with the tiling in the back-room's bathroom. Well, in the mind, it appeared to be not such a big deal. In practice, however... Man! If I had know what I'm getting into with this idea, I would have stayed with the same-old, boring, typical just-slap-them-on design! Turns out I have to cut more than half of all tiles to measure, with various angles. Adding the holes for the water-pipes - aye aye aye! 


Well, today, I didn't do much tiling, though, because the electrician came to finish up the electrical installations. These tasks were weighing heavy on my mind, as I didn't feel I would be able to easily do it myself, should he decide to not come back. Well, he did come back. And he did them all. Yeay!


Hm. Yeay to a degree... It turned out, he didn't install a 10cm x 10cm electrical box, but simply left the conduits end somewhere in the wall. And, he didn't remember where exactly these pipes are. So, he proceeded to use the jackhammer to open the floor along the wall, trying to find them...


Interesting approaches! First he used the steel band that electricians use to pull the wires into the conduit, asking me to try to listen to where about I might here the scratching in the floor. 


Secondly, he proceeded to pour water into the conduit at the breaker-box - hoping that there will be a moist spot, telling us where the pipe might be. after digging around for about 1/2 hour, ruining the floor at a span of about 60 cm along the wall, we noticed a wet spot in the concrete, a few cm further left than where he was digging. So, he dug some more at the new spot, and finally found the tubes. Then he opened the wall to allow for extending the conduits to a height of about 25 cm above the floor, where he created a bigger hole to hold the 10x10 box.

From now on it was all relatively smooth sailing. Pulling the wires, installing the outlets, and done! 

Yeay. He was done! For me the hole mess is left to clean up and fix again! Iris had hired a guy to apply stucco to the walls. Later, I had hired a guy to apply drywall compound on top of the  stucco. And finally another person to sand the hole thing smooth. Finally, I painted the walls with a sealer-primer first, and two coats of paint later. The very expensive, work-intensive wall now had a big gapping ca帽on! The floor, too, now had a hole in it, that goes all the way to the earth under the concrete slab. I have to fill that hole with slab concrete, then apply topping again, and try to get it all smoothed out again...

So, yes, he was done. But for me the work now just started!!! 馃し‍♂️馃槱


But, hey, I'm not complaining - at least not too loudly! He did hook up the electrical installation in the back-room with the breaker-box. So now we can use the outlets there, and I can install the light as well... 馃お


Once he left, I was in good spirits, so I glued the tiles I had cut to measure last night. 


Then I decided to fix another problem the electrician created for us: there are no outlets on the terrace! Well, local folks don't have a terrace, and if they do, don't care about electricity out there! "Somebody else might come and steal electricity by plugging in an extension cord! So best not to have outside outlets!"

Well, we want outlets out there!

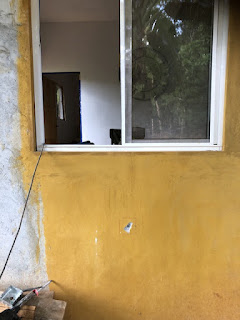
I opened the outlet box in the living room, that is in the wall to the terrace. From there I drilled a hole to the outside, so I know where to create the hole for the 10x10. Trying to not make a huge hole like the electrician did, I drilled a few priming holes with the hammer drill, then sed the chisel to cut out the hole. See for yourself the difference!


Center hole as pilot drilled from the enter of the outlet box inside 

More pilot holes to outline the hole for the box

with the chisel now "cutting" out the 10x10


inside, the back of the 10x10 box of the inside outlet is visible

Hole is ready
10x10 cm (4x4") outlet box inside


A connector on the inside box, anther on the new outside box, and a tiny piece of conduit to connect them and run the wires from the inside to the outside. One connector needed to be shortened a little bit, so the 10x10 is flush with the outside wall...

Used some leftover Romeral to start filling the holes. Once that is dry in two or three days, I might need some more cement, or be able to directly apply the drywall compound... we'll see. The large hole in the floor left open will need more cement later, too...

By now the sun was setting, so I left the rest for tomorrow: installing outlets outside, connecting them to the outlets inside, and adding a switch inside, with which I can turn off the electricity for the outside outlets. Darn! There the neighbors already were rubbing their hands anticipating to steal electricity, and this damn gringo foiled their plan!!!

Well, all in all, it was a productive day again! Electricity all done (aside of the outside outlets which I can do myself), tiling progressed a little, too!

Tomorrow's another day... for today, let me clean up and head ot the restaurant. Maybe there will be guests again today, with whom I can have another of my typical inspiring conversations...


Monday, April 17, 2023

The roof - day 3

Yesterday, the installation of the sheet metal on the east side had started. Today, they finished that whole east side. And started the installation on the west side, too.

https://drive.google.com/uc?export=view&id=1CMe2Sb5C8Kbt5WbfvHuK0tJyaC854-nE


Here, we encountered another obstacle!

I had purchased most of the sheetmetal last year already - in anticipation of prices rising and thinking the construction would start by August or so... Well, construction didn't start until March! But, here we are, and I'm glad I had bought the cariolas and sheet metal last year - this year they are almost 20% more expensive!!!

Well, I had bought "almost" all sheet-metal... Why just "almost"? Maybe in another post... 

The sheets I bought are 5.5 m long. But the west-side of the roof is 7.5 m. So I needed sheets to cover the remaining 2 m. I ordered them at the ferreteria, and had them delivered. But, as we were trying to install these small pieces, it turns out, the canals of the 5.5m sheets are of a different width then the canales of the 2.1m sheets!!! 

https://drive.google.com/uc?export=view&id=1uadRwzgs_r9ln52Hh-ta6onrjPx7omGihttps://drive.google.com/uc?export=view&id=1M9fxEjjTpznpNj0-dQ9Hf0fly4u-BqH4

Impossible to use these small sheets! WHat to do?!?

I decided to cut 6 of the remaining 20 5.5 m long sheets; each creating 2 2.1m sheets and a 1.2 m sheet. Thus, with two large sheet cut, I was able to cover the missing part of 5 large sheets. All in all 14 runs of the 18 that make up the whole roof.

After work I went to Bugaba to the Ferreteria and I ordered 4 more sheets of 5.5m, and two sheets of 4.20 (to create all together 4 2.1 m long sheets, to cover the missing part of the 4 new runs. I got them delivered the next day (day 4). Yeay! Problem solved! Situation stable!

So I thought...

Sunday, April 16, 2023

The roof - day one

Today's the day! Today we're starting the roof! Yeay!

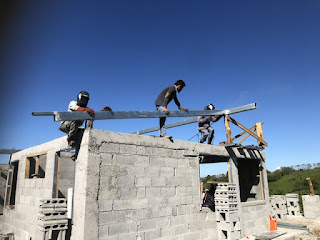
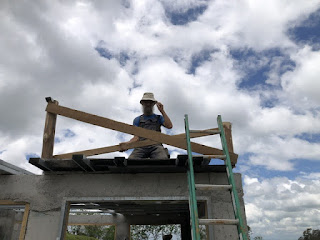
First task is to lift the center beam up onto the four main posts ontop of the columns of the wall. This is a monster! 6 pieces of 6" cariolas welded together to make a single 18 m long cavallo!

But, four guys simply grabbed that thing and lifted it up as if it was made of cardboard! Fascinating how much strength these people here have!!!


After that was in place, and the little pieces of cariola that were slid into the grooves on top of the posts were welded onto the center-beam it was stable enough to start attaching the roof trusses. 


One by one, all four of the ones that support the east side of the roof were put in place.


I had worried about that a lot - playing the process in my head over and over again. It turned out to be really not much of a big deal after all! Phew! I'm really glad about that!!!

Once the roof-trusses were in place the 6-fold H of 4" cariolas was lifted and put in place, and welded onto the trusses. Now, nothing moves anymore!


Then, from the top down, the remaining 4 pieces of 18 m long 4" cariolas were placed and welded. This all was quite easy! 


The first group even started putting the first couple of sheets of zinc (sheet metal) in place, and screwing it onto the finished east side-structure.
By the end of the day, the east side looked already very nice! Structure finished, and 4 runs of the sheet metal in place! Yeay!

Tomorrow will be a difficult day, though, We need to install the trusses for the west side of the roof. They rest on the long columns which need to be mounted onto the little pedestals on the terrace. Not sure how we can get these columns mounted and stable enough that the trusses can be put in place.

Once the trusses are in place, these columns can't move much anymore and we're golden... But how to get there? That's the big question!

The roof - Earthquake - Lessons Learned

Roofs in Panama are relatively uncomplicated. There's a roster of cariolas and a layer of sheetmetal on top of it, affixed with screws. All of it rests on some columns.

My roof is just like that.

Sounds simple, right? Yeap. And in theory, there's no difference between theory and practice. But, as you know, in practice there is! (Yogi Bera )


So, the theory is, I have 4 columns on the terrace, 2 rows of each 4 columns ontop of the walls of the rooms, and the corners of the bathroom which carry the trusses. Since I have a teak plantation and love wood, I decided to use tree trunks as columns. When the trusses are installed and the cross bars welded on, the whole structure is very stable.


Here' comes the practical part:


To assemble the whole thing, these columns need something to keep the vertical! They rest on a metal boot which is concreted in into pedestal on the terrace or wall. But it's the same problem as trying to standup a pencil... 

Yesterday there was an earthquake just about 70 km away; 6.6 on Richter scale. It was quite noticeable! My glassjar actually fell off the shelf and broke, that's how strong I felt it here! 


It's a bit scary, but if you're standing on the ground and don't have a large building or structure atop of you, it's not really a problem.

What it did do, though, was, to remind me, I need to keep earthquakes in mind with my house! I have everything build on a solid concrete slab, which rests on a thick layer of crushed rocks. So if something moves about the house, the whole house is moving. I am hoping it won't develop cracks from tensions created by traditional foundations shifting in relation to each other. So that is "bien"!

But, looking at the structure from the distance, it dawned on me, that the columns that hold up the roof need to be supported in a way, that even if the house starts moving sideways, they won't loose their balance.


Being spiritual as I am, I see this earthquake as sent by the Universe to help me make the next step!


As I am thinking about how to reinforce the columns, I realize, that this is actually the solution for the problem of how to install the roof trusses one by one and keep the columns vertical while doing so!


So, today, I added, where visible, cross boards criss crossing the space between two columns on top of the walls; and where not visible later, 1/2" rebar criss crossing the columns of one row with the respective other of the next row. With that, I have 2 groups of four columns which are interlocked and stabilized amongst each other. 


That allows me to lift the heavy center beam in place, and weld it onto the little pieces of cariolas I used on top of the columns. And later, I can lift the trusses in place, too, and have the columns not just sustain vertical force of the weight, but also horizontal force of the trusses shifting and moving during installation.


Another item of practice vs theory:

The central beam consists of 6 pieces de 15cm by 610cm cariolas, calibre 16 (the strong one). Each of them weights (estimated) 40 to 45 kg (80 to 90 lb). The whole thing is 18 m long and weighs somewhere between 240 to 270 kg!

[one of the trusses - a “cavallo” built of two sandwiched cariolas]

It needs several strong men to lift that thing! And, until it is welded in place, and supported by welded-on trusses left and right, these men need to hold it in place. 

My original design did not have this center beam, but only 4 individual trusses, running in parallel. The architect added this piece. Also, my design had the roof be symmetrical, so both sides the same area, and the same inclination. 


That centerbeam, of course, needs to be supported, so the architect put it ontop of one row of columns - he chose the columns on top of the corners of the wall. Now the roof above the terrace is about 5 meters wide, and the side above the rooms is 7 meters.

Really, that center-beam carries no weight whatsoever. It did not need to be so strong! Instead of using ultra strong and heavy 15cm wide cariolas, 7.5cm wide ones would have sufficed! And I think we wouldn't even have needed to make a "cavallo" - that is double the U-shaped cariolas to make a tube shaped beam.

But, we have the thing already, so we might as well use it...

However, how to put it in place?!? If we put it ontop of the columns on the corners, all the strong men are standing on one side of that heavy thing. If it ever shifts too far to the other side, we won't be able to hold it, and it will fall to the ground - who knows what kind of damage this might cause. And the one or other men might fall with that thing off the ceiling of the room as well!

So, today, I came up with the idea of flipping the roofside around - i.e. have the terrace roof be the 7m wide one, and the roof above the rooms the 5 meter wide one. That allows us to put that centerbeam ontop of the column that in the center of the wall of the room, rather the corner. With that, men can stand on either side of it when it is being put in place!


Today, I was able to install one and a half of those 2 4-columns groups. Yeay!


I did not have enough teak logs for all the columns. So I thought of using some other logs. Unfortunately, ants got into one of them. It would be very difficult to replace such a column once the roof is in place. So I don't want to risk just to kill the ants and install anyhow. Instead, I contacted the sawmill and asked for another log. It's cedar or oak or teca - I will see once he delivers it, hopefully tomorrow...

Once I have this log, I can finish the second group of 4-columns. And once that is done, we can install that darn center-beam. And after that, we can install the roof trusses of at least on side of the roof. For the other side, I need to install and reinforce the long posts on top of the pedestals on the terrace. That's another hot topic, for which I am not yet sure I have a solution that will work in practice... 

Well, tomorrow is another day... We'll see what I'll learn today, and what ideas I'll be given by the Universe tonight...

The roof - day 6 - Sunday

On Sunday, Sergio came over for another 1/2 hour to add a few more missing screws to ensure all sheets are securely fasten onto the cariola structure. Originally, we had planned on installing the caballette - the sheet-metal that is put on top of the roof, right above the main cavallo, just where the sheet metals of the east and west side meet.


However, After he ensured me that not installing it will not cause much water leakage, I decided to postpone this task until we come back from Santa Catalina in 2 to 3 weeks...

More than 88 screw heads need to be covered by sealer paint - it gets mighty hot in the sun ontop of that roof!

I spent the Sunday morning on top of the roof, covering all 800 screws with Sulfatil ( a thick paint-like liquid that serves as sealer) to ensure none of the screw holes. It took almost a hole quart. Well, I'm telling you: It gets mighty hot on the roof in the sun - even though we're 700 m (2200 ft) above sealevel!
 
Oh, why did I postpone the installation of the caballette?

Well, I noticed that even thought the sun is heating uo the roof quite a bit, and in the sun it is quite hot, under the roof it is very comfortable. Not too hot, not too cold. I'm guessing this is, because the hot air that develops right below the burning hot zinc, is rising up to the highest point of the roof, and, as there is no top yet, escaping freely to the outside. I'm guessing, once the caballette is in place, the air will no longer leave so easily, and it will get a bit hotter. When I mentioned my concern to Sergio he confirmed: once the caballette is in place, it won't be so nice and cool anymore on the terrace!

Last night I had another one of these great ideas...

If, instead of screwing the caballette directly onto the zinc, I screw pieces of cariola onto the zinc, and the caballette ontop of these cariola pieces, there will be holes, through which the hot air can escape. And, since the caballette is 60cm (2ft) wide, the overhang of the caballette over the zinc will still be wide enough in relation of the 7 or 10 cm height of the cariolas, that rain won't be able to enter.
To do this, however, it requires to cut about 40 pieces of cariolas, and drill 2 or 3 holes into each of them to attach them onto the zinc. That takes time. And one person on a Sunday morning is not going to be able to accomplish this...

So, I'm hoping the gap on top is not going to cause too much problems, and we'll be able to do the right thing when we get back here...

And, I guess, I'll be adding another "The roof - day X" post by then...

The roof - day 5

So, yesterday we ended the day with the roof almost finished. 20cm short, due to the new zinc being narrower than the original, and 4 2.1m pieces missing to complete the last four runs. I was really frustrated and pissed.

But, like so many times before, over night I got an idea! First thing in this morning I measured the second set of sheets, the ones that didn't work for the original ones, which forced me to cut those beautiful long sheets into pieces to make up for the missing 2 m on top! Ha! Turns out, their canals are 31 cm! Yeay! They didn't fit the original zinc, but they do fit the new long sheets!

https://drive.google.com/uc?export=view&id=1YF0VXWpcSwy5EGHIcjuxTGxn-zBVCAeZ
Roof almost finished - Weibi, the dog who adopted me last year when I arrived, and two of the five puppies she graced me with in December, are enjoying the cool evening and sunset


And, to compensate for the missing 20cm overall roof width, I had one of these sheets of the second set cut in half lengthwise, making 2 pieces of 4.2 m. Using these as second to last run - with a little more overlap as usual - and then finishing up the roof by using the 4th new long sheet with one more of the 2.1 m long sheets of the second order.

Phew! What a juggling!!!


Finally, the installation of the missing two pieces of facia on either side of the west-slope of the roof, made the day complete!

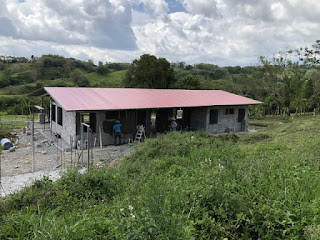
The roof is finished! 

Well, almost...


The roof - day 4

Yesterday, the east side of the roof was completed, and the west side got 14 of 18 runs, too. Now. the house looked like a house already. It was possible to get a feel for the terrace, and the rooms, and bathrooms. 

It felt AWESOME!!!

https://drive.google.com/uc?export=view&id=1SB3Qw8OE6gbfOHJ_paVcGX4eHOn1Mjyy
Looking at guest room from terrace, part of the kitchen area on the left
https://drive.google.com/uc?export=view&id=15eBlgwMtdWQYq7d2fZLjnQdJgI2NjSm5
Looking at master bedroom from terrace, other part of the kitchen on the right
https://drive.google.com/uc?export=view&id=1osWOQtY-RghJI2H85Mn81OFbzQI--h3R
Much of the roof already in place. Guest room in the foreground,master bedroom in the back-ground, and large terrace in front of them
https://drive.google.com/uc?export=view&id=1HtpaVV4ryD_gRgjbNOHO_VRNfhJuhYgB
Terrace and view as seen from the kitchen


I had ordered the missing zinc (the local name for roofing sheet metal), and had it delivered yesterday. So we're all set to finish the roof today! Yeay!

So I thought!

Turns out, the 5.5 m long pieces were from a different manufacturer than the 4.2m long pieces. And, these manufacturers use a different canal width! Sounds familiar? Well, yes! But, originally, the problem was - so I thought - that I had bought the zinc form different ferreterias at different times. This time, I made sure I bought them at the same time form the same ferreteria!

Still, they had given me incompatible zinc!!!

https://drive.google.com/uc?export=view&id=1x_yxwafqvMDdl1epEGhikdCfaa3ycpV1
5 canals 30.5 cm
https://drive.google.com/uc?export=view&id=1XmYULmW75kd6iNKHRdYCEqg60g6nxtyM
5 canals 31 cm
https://drive.google.com/uc?export=view&id=1ZZ5owyM-xkJGs_sO8YCSlkZwVnriXr1a
another one with 5 canals 31 cm
https://drive.google.com/uc?export=view&id=1S-ij2Ou0XwQAnvcIwMCrDsVd1S8nJVYh
5 canals 30 cm


I was really pissed! Not just is that stuff quite expensive! But I now have a whole crew of workers here, that can not continue with their work - but still want to be paid for the day!

I climbed onto the roof and started measuring the canal0-widths: original ones: 30cm for 5 canals. New long ones 31cm, new shorts 30.5cm! Darn!!! Aside of that, the new long sheets are a few cm less wide than the original ones. So, the last 4 runs come out about 20 cm to short for where the roof should end!!!

After some lamenting and - yes I admit - cursing, they day finished with 4 runs missing the top 2.1m, and the zinc ending 20 short of the end of the roof!

Well, almost! 

The roof - day 2

Well, to connect with the last post: I did get an idea for the four big columns.

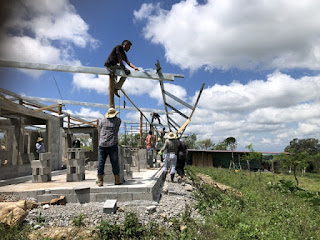
 Instead of individual small peaces of cariolas, I connected three full 3" cariolas  to make one long piece.  Then, we were able to place this long piece onto all four columns, while they are still on the ground.With four strong men, and a fifth one ready with the welding machine, we then lifted the four colmns in place. The welder connected a rebar crossing from column A that we just lifted, with column B on top of the wall, and the large column B with the little column A on top of the wall. This criss-crossing of rebars held the columns quite stable in place.

In the next step, two guys lifted the truss on top of the three columns and welded it all together. Then repeated the same for the other three trusses.

https://drive.google.com/uc?export=view&id=1flC1Qxz0pIq90J5_nKlMh5wp1G2okaouhttps://drive.google.com/uc?export=view&id=1U8IV0Dy85hA68Ou2w9loTxpE58zQnjY-https://drive.google.com/uc?export=view&id=18_IXz93hUofXfkhhwX9UcMvmnaCJyBFkhttps://drive.google.com/uc?export=view&id=1ps6skRJ9_YO3OUZny943f6rMoyrGswuhhttps://drive.google.com/uc?export=view&id=1BhN_iiIKGN3ou7ocOceg-B_7Brph2JgF

With all the trusses in place, we lifted the prepared 18m (60ft) long, 1.2m (4 ft) wide 6-fold H of 4" cariolas in place, secured them with straps, ensured there was the same overhang on both sides, and welded them in place. 

The final stop to finish the structure, which will hold the sheet-metal, was then really simple. Just weld the 18m long 4" cariolas at a distance of about 1m from each other form the top to the bottom.

After the 6-fold H was in place, the masons returned to putting plaster onto the walls, and the second roofing crew went back to the other side of the roof, adding more sheetmetal onto the structure that was completed yesterday.

By the time the evening of day 2 came, the eastern half of the roof had 5 of the 18 sheet metals installed! Yeay! And the western half of the structure was completed as well.

A very productive day! And the part that I was most concerned about - aside of installing the main cavallo - was taken care of, and turned out to be relatively easy!

Trump - beloved the world around…

There’s a custom for new year’s celebrations in Panama to build a puppet and burn it around midnight on 31st of December. Well, the people i...